Mastering Your Opening's Pawn Structures
Vaclav Pekar wrote: “I would like to ask you about my game with GM Voloshin. I played it in the Trade Fair Chess Festival in Brno (Czech Republic). I was doing really well in this tournament until this game. Except for the first round (which I blundered and made a draw with 1800 player), I beat two relatively strong players then drew with a 2380 and drew again with GM Manik (2397). In the game with GM Manik I was probably winning, but after working all day and several hours of playing I wanted to go home and agreed to a draw (I was angry about myself afterwards). The next day I played with GM Voloshin with the black pieces. I knew his plan, which was apparent right from the start of the game. He doubled my f-pawns and he was going to try to win in the endgame thanks to his three-to-two pawn majority. I tried to find compensation for my doubled pawns in active pieces and a Bishop vs. Knight imbalance. After we reached the endgame my pieces were fairly active but then my position started to deteriorate (though not according to the computer, which still gives no more than a tiny plus for White only a few moves before resigning!). Despite all this, I knew his plan but failed to stop it and eventually resigned in a hopeless position. I am really not sure what the decisive error was.”
Mr. Pekar, this brings back a lot of memories! At one point (a zillion years ago) I actually had an apartment in Brno, though I’m sure it’s changed drastically since my days there. Anyway, before I bore everyone with a maudlin trip down memory lane, let’s jump right into your game!
Leonid Voloshin (2411) – Vaclav Pekar (2155) [D01], Brno 2011
1.d4 Nf6 2.Nc3
In general, this move doesn’t fit well with 1.d4. The reason is that it fails to place maximum pressure on the important d5-square, and it also doesn’t do anything for the eventual freedom of white’s Rooks. Far more common is 2.c4 (gaining central and queenside space) when 3.Nc3 will join with the c4-pawn to pressure d5, while also setting up situations where – if Black plays …d7-d5 at some point – White will chop on d5 (cxd5) and open up the c-file for his Rooks.
Nevertheless, 2.Nc3 has its supporters – the early Knight move forces black’s hand (…d7-d5), otherwise White will play e2-e4 and grab the center. This often leads to sharp, unusual play, and can easily take Black out of all his opening preparation.
2…d5
Otherwise White will grab the center with e2-e4. Of course, that’s not the end of the world. For example 2…g6 3.e4 d6 transposes into the Pirc Defense.
3.Bg5 Bf5
Black has all sorts of interesting ways to meet the Veresov. 3…e6 is a great move if you play the Classical French since White can answer with 4.e4 when a French Defense has appeared.
3…Nbd7 is my personal favorite:
M. Duckworth - Silman, Santa Barbara 1988
1.d4 Nf6 2.Nc3 d5 3.Bg5 Nbd7 4.f3
Harmless is 4.e3 g6 5.Nf3 c6 (Or 5…Bg7 6.Bd3 0-0 7.0-0 c5 8.Re1 b6 9.e4 dxe4 10.Nxe4 cxd4 11.Nxd4 Bb7 and black had no problems, [though I quickly managed to create some for myself in the game!], R. Hurdle (2225) – Silman, Paul Masson 1980) 6.Bd3 Bg7 7.h3 0-0 8.0-0 c5 9.Bxf6 Nxf6 10.dxc5 Qa5 11.Nb5 a6 12.Nbd4 Qxc5 13.Rc1 Qc7 14.Nb3 b5 15.Nh2 Ne8 16.c3 Nd6 17.Be2 Bb7 18.Bf3 Nc4 19.Qc2 Rfd8 20.Rfe1 Nd6 21.Nd2 Rac8 22.Qb3 e5 23.Nhf1 Kh8 24.a4 f5 25.axb5 axb5 26.Ra1 Bc6 27.Ra6 Qb7 28.Rea1 Ra8 29.Qa2 Bf6 30.Nb3 Nc4 31.Rxa8 Rxa8 32.Qb1 Rxa1 33.Qxa1 Qa8 34.Qb1 Qa7 35.Nbd2 Nb6 36.Be2 Kg7 37.Nb3 Be7 38.Nfd2 Kf6 39.g4 Bd6 40.Qa1 Qxa1+ 41.Nxa1 Na4 42.Nab3 Nxb2 43.Na5 Bd7 44.Nb7 Be7 45.f4 exf4 46.exf4 Na4 47.g5+ Ke6 48.c4 dxc4 49.Nxc4 Nc3 (49...bxc4?? 50.Bxc4 mate) 50.Bd3 bxc4 51.Bxc4+ Nd5, 0-1, P. Stein – Silman, Reno 1988.
4…c5
Other moves:
1) 4…h6 5.Bf4 c6 6.Qd2 e6 7.e3 Nh5 8.Nge2 Nxf4 9.Nxf4 Bd6 10.Bd3 e5 11.Nfe2 Qh4+ 12.g3 Qf6 and Black had a very good game in M. Duckworth – Silman, LaBate 30-Minute Tournament 1988
2) 4…c6 5.Qd2 (Sharpest is 5.e4 dxe4 6.fxe4 e5 7.dxe5 and now both 7…Qa5 and 7…Nxe5 have proved to be exciting and perfectly okay for Black) 5…Qa5 6.e4 dxe4 7.Nxe4 (7.fxe4 e5) 7...Qxd2+ 8.Nxd2 e6 and black’s already equalized, J. Lakdawala – Silman, S California Closed Ch. 1989.
5.e4
5.dxc5 is a favorite of Khachiyan, though it’s interesting, I wouldn’t be quaking in my boots: 5…Qa5!? 6.Bxf6 Nxf6 7.Qd4 e5 8.Qxe5+ Be6 9.e4 0-0-0 10.c6 Bd6 11.Qd4 dxe4 12.Qa4 Qg5 13.Ba6 Bc5 14.Nd1 Qxg2 15.Bxb7+ Kb8 16.Ba8 Rxd1+, 0-1, N. Dobrev (2407) – D. Howell (2487), Marseille 2006. Of course, Mr. Khachiyan surely has improvements for White!
5…dxe4 6.d5
The critical reply. Less bothersome is 6.fxe4 Qa5 7.Bxf6 (7.e5 Ne4 is nice for Black) 7…exf6! has scored well for Black.
6…exf3
If Black wants to avoid giving White an attacking position, he can consider 6…Qa5!? 7.Qd2 a6.
7.Nxf3 g6 8.Qd2 Bg7 9.0-0-0 0-0 10.Be2 (10.Bh6 is more common) 10…a6 11.h4 b5 12.Qf4 Nh5 13.Qe3 Ng3 14.d6 Bf6 15.Ne4 Nxh1 16.dxe7 Bxe7 17.Ne5 Qe8 18.Nxd7 Bxd7 19.Bf6 Ng3 20.Qxg3 Bc6 21.Nd6 Bxd6 22.Rxd6 Qxe2 23.Qf4 Rae8 24.Bg5 Re6 25.Rd2 Qc4 26.Qg3 Qxa2 27.Rd6 Qa1+ 28.Kd2 Qxb2 29.Rxe6 fxe6 30.h5 Qd4+ 31.Ke2 Qe4+, 0-1.
4.Bxf6
4.f3 is the main line, which leads to very sharp play. However, more positional players usually prefer the capture on f6, which gives White a long-term structural advantage.
4…exf6
4…gxf6 is also played, but 4…exf6 has a better reputation.
5.e3 c6 6.Bd3 Bxd3
This removes black’s Bishop pair and, by simplifying, takes away any dynamism that might have remained in the black position. My old friend grandmaster Nigel Davies (we shared some interesting adventures in the jungles of Brazil – these included an attack on the Mayor’s house, me pretending to be a cop and demanding entrance [by kicking in a door] to a well known grandmaster’s hotel room, an insane Hitler mime that kept sneaking up on the players and freaking everyone out, and a stampede of coatimundis at Iguazu Falls), in his book, THE VERESOV (2003), had this to say: “Black’s best plan is to retreat his Bishop from f5 to e6, play …f6-f5, and then bring his Knight from b8-e4 via d7 and f6.”
7.Qxd3
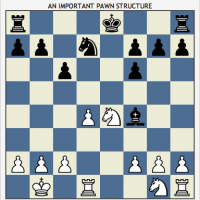
The fact is this position is a little better for White, with the caveat that Black’s ideal result is a draw, while White will be pushing for more throughout the game. In other words, it’s an ideal grandmaster opening that offers White chances to win, and few chances to lose. Why is this the case? The pawn structure answers that question: white’s structure is devoid of weaknesses and offers two key pawn breaks – c2-c4 or e3-e4. Black’s structure is less flexible and lacks the same type of fluid breaks since …c6-c5 would leave d5 weak, and …f6-f5-f4 is very difficult to achieve. Other than these basic positional ideas, if Black castles short, White can also go for the kingside nuke option via g2-g4, h2-h4, etc. Thus, for the most part black’s position is passive, and he’ll usually just hold tight and hope to earn that half a point.
7…Bd6
7…Bb4 is also commonly seen, which stops White from playing a quick e3-e4.
8.e4
This move, which scores very well for White, seeks to create a favorable pawn structure in one of two ways: 1) Black will leave the pawn on e4 and let White take on d5. The resulting isolated pawn on d5 will prove rather weak; 2) Black will capture on e4, which will result in positions where White is half a pawn ahead (black’s crippled kingside majority won’t be able to create a passed pawn in most endgames). In this 2nd scenario, Black isn’t badly placed, but he will face a long, thankless defensive task. And, as I said earlier, if black’s successful, he’ll get no more than a draw.
8…dxe4 9.Qxe4+ Qe7
9…Be7 10.0-0-0 0-0 11.d5 leaves White in charge.
10.0-0-0 Qxe4 11.Nxe4 Bf4+ 12.Kb1 Nd7
12…Na6 (12…0-0 13.Ne2 Bc7 14.Nc5 b6 15.Nb3 Nd7 16.d5 cxd5 17.Nc3 Rad8 18.Nxd5 Bd6 19.Nd4 Ne5 20.Nf5 Bb8 21.f4 Ng6 22.g3 and White was in the driver’s seat in the game H. Tabatt (2322) – O. Zierke (2300), 80th German Championship 2009.) 13.Ne2 Bc7 14.d5 cxd5 15.Rxd5 0-0 16.Rhd1 Rae8 17.N2c3 Re5 18.Rd7 Rfe8 19.a3 h6 20.Nd6 Bxd6 21.R1xd6 Nc5 22.Rc7 R8e7 23.Rd8+ Kh7 24.Rxe7 Rxe7 25.b4 Nd7 26.Kb2 Nb6 27.Kb3 a6 28.a4 Rc7 29.a5 Nc4 30.Na4 Ne5 31.Nb6 Nc6 32.Rd7 Rxd7 33.Nxd7 Kg6 34.Nc5 Nd8 35.Kc4 Kf5 36.Kd5 Nc6 37.c3 Nd8 38.Kd6, 1-0, Igor Dmitriev (2368) – Aleksey Barbitskij (2230), St Petersburg 2002.
The pawn structure after 12…Nd7 is identical to positions Ulf Andersson got in the 70s. In fact, the Black side of this structure was his bread and butter and he rarely lost against world-class opposition! If you or anyone else wants to play this line vs. the Veresov, you need to make a detailed study of that structure and then you can enter these lines with confidence. Actually, this is how you should study all openings: master the pawn structures, understand the pros and cons of those structures, and only then memorize some moves (they will make a lot more sense after you “grok” the structures).
Here’s a sample of the kind of games you should study if this structure was something you wanted to embrace:
1.e4 c6 2.d4 d5 3.Nc3 dxe4 4.Nxe4 Nf6 5.Nxf6+ exf6 6.Bc4 Qe7+ 7.Qe2 Bg4 (7…Be6 8.Bd3 c5 9.dxc5 Qxc5 10.Nf3 Nc6 11.0-0 Bd6 12.h3 0-0 13.Be3 Qa5 14.Bd2 Qh5 15.Nd4 Qxe2 16.Nxe2 Ne5 17.Bf4 Rfc8 18.Be4 Rc4 19.Bxb7 Rb8 20.Rfd1 Bc7 21.Ba6 Ra4 22.Bd3 Rxb2 23.a3 g5 24.Bg3 f5 25.Nc3 Ra5 26.Bh2 Kg7 27.Kh1 h6 28.Rf1 f4 29.Bg1 Nxd3 30.cxd3 Be5 31.Rfc1 Rb3, 0-1, Milan Jovcic (2200) – Ulf Andersson (2545), Titovo Uzice 1978.) 8.Qxe7+ Bxe7 9.Ne2 (9.Bd2 0-0 10.Ne2 Nd7 11.0-0 Nb6 12.Bd3 Rfd8 13.Rfe1 Bf8 14.c3 c5 15.Be3 Nd5 16.Ng3 Rac8 17.Be4 Nxe3 18.fxe3 b5 19.d5 Bd7 20.Bc2 c4 21.e4 Re8 22.Rf1 Re5 23.Rad1 Bc5+ 24.Kh1 Kf8 25.h3 Rce8 26.b4 Bd6 27.Rf3 h5 28.Rdf1 Ke7 29.Ne2 a5 30.a3 Ra8 31.Nd4 Kd8 32.Rg3 Bf8 33.Nf3 Re8 34.e5 fxe5 35.Ng5 f6 36.Nh7 axb4 37.axb4 Ra2 38.Bg6 h4 39.Bxe8 Kxe8 40.Rg6 Kf7 41.Nxf6 Kxg6 42.Nxd7 Bd6 43.Nc5 Rd2 44.Ne4 Rxd5 45.Kg1 Be7 46.Kf2 Kf5 47.Ke3+ Ke6 48.Ke2 Rd3 49.Rf3 Rd8 50.Rf1 Ra8 51.Rd1 Ra3 52.Rb1 Kf5 53.Kf3 Rb3 54.Rf1 Ke6 55.Kf2 g6 56.Re1 Kf5 57.Re2 Ra3 58.g3 Ra1 59.Kf3 Rf1+ 60.Kg2 Rd1 61.g4+ Ke6 62.Rd2 Rxd2+ 63.Nxd2 Kd5 64.Kf3 Bxb4 65.cxb4 c3 66.Nb3 Kc4 67.Nc1 Kxb4 68.Ke2 Ka3 69.Kd1 Kb2 70.Nd3+ Kb1 71.Nb4 e4 72.Nc2 e3 73.Nd4 b4 74.g5 Kb2, 0-1, Ricardo Calvo Minguez (2420) – Ulf Andersson (2565), Copenhagen 1977.) 9…Nd7 10.Nf4 Nb6 11.Be2 Bxe2 12.Kxe2 0-0-0 13.Rd1 Rhe8 14.Kf1 c5 15.Ne2 f5 16.Bf4 Nd5 17.dxc5 Bxc5 18.Bg5 f6 19.Bd2 Re6 20.Nf4 Nxf4 21.Bxf4 Re4 22.Rxd8+ Kxd8 23.Rd1+ Ke7 24.Bd2 Bd6 25.b3 b5 26.h3 a6 27.f3 Re6 28.Rc1 Kd7 29.Rd1 Ke7 30.Re1 Be5 31.f4 Bd6 32.Rxe6+ Kxe6 33.Ke2 Kd5 34.Kd3 Bc7 35.c4+ bxc4+ 36.bxc4+ Kc5 37.a3 Kc6 38.g3 Bb6 39.Ke2 Bd4 40.Bb4 Kd7 41.g4 fxg4 42.hxg4 g6 43.Kd3 Bb2 44.Ke4 Kc6 45.f5 Ba1, 1/2, Leonid Stein (2620) – Ulf Andersson (2535) [B15], Las Palmas 1973.
13.Ne2 Bc7 14.d5
Actually, this pawn is keeping an eye on two important squares (c5 and e5) so I’m not sure White should rush to make this swap. In fact, Black would eventually try and trade off that pawn himself via …c6-c5. On the other hand, Mr. Andersson has already shown us that this position (with or without d4-d5) isn’t a big deal for White, as long as Black understands the nuances of this structure.
14…cxd5 15.Rxd5 0-0-0 16.Rhd1 Ne5 17.h3 f5 18.Rxd8+ Rxd8 19.Rxd8+ Kxd8
One should be aware of the difference in mentality here: Black played into this thinking that he had a very good chance to draw a strong player, while White entered it because he knew he had a very good chance at wearing Black down without suffering any risk whatsoever. And … both players are right!
20.N4c3 Bb6 21.f4 Nc4 22.Nd5 Bf2 23.b3 Nd2+ 24.Kc1 Ne4 25.c4 Kd7 26.Kc2 Kd6 27.Ndc3 a5 28.Nb5+ Kc5 29.Nc1
White continues to play strong, calm moves. He knows Black will need to make some mistakes to lose the game, so he doesn’t rush – instead he quietly builds his position, seeks ideal positions for his Knights, and hopes Black cracks due to the strain of having to constantly defend.
As you can see, the experienced (and strong) player knows very well that one-move threats literally force the opponent to be on his guard, and that the resulting heightened sense of danger usually results in good moves. Thus, instead of forcing the issue, White patiently keeps improving his position and follows this classic old rule: “When in doubt, let the opponent get an idea, it’s bound to be wrong.”
29…Bg3?
The Bishop is offside here. Keeping it centralized by 29…Be3 makes a lot more sense. Oddly, Black will experience severe difficulties after 29…Bg3 (though computers think that Black is fine, a very deep analysis will show that, at least for humans, this isn’t the case). In fact, for all intents and purposes, one can say that this is the decisive mistake because, even though I think the game can still be saved, the defense is so difficult that many players (even masters) would go down in flames.
Of course, 29…Kb4?? runs into the slightly unpleasant 30.Nd3 mate.
30.Nd3+ Kb6
Not optimal, but 30…Kc6?? 31.Nd4+ followed by 32.Nxf5 isn’t what Black wants.
31.Nd4 g6 32.Ne2
White’s playing very well – he’s improving the placement of his minor pieces, keeping the enemy King from entering his position, and preparing to kick his queenside pawn majority into action.
32…Bh2??
This probably loses (I don’t have the time to be 100% sure about anything – the position seems simple enough, but it’s actually remarkably complicated). Here are a few illustrative possibilities (that are mere tastes of what really lurks in this position):
* 32…Bf2, getting the Bishop into play, makes a lot of sense. However, it’s still a tricky defensive chore: 33.a3 (33.Nxf2 Nxf2 34.a3 Kc5 and Black will draw easily) 33…Be3 (the Bishop finally reaches a safe central perch) 34.b4 axb4 35.axb4 Kc7 36.Ne5 (36.c5? Kc6 gives black’s King two juicy squares on b5 and d5) 36…f6 (at first glance, 36…Bd2 37.Kb3 Ng3 looks very attractive: 38.Nxg3 Bxf4 39.Nxf7 Bxg3. However, the combination of white’s far superior King, his queenside majority, and the flexibility of the Knight leave Black struggling after 40.c5 Bf4 41.Kc4.) 37.Nf3 Kd6 38.Nfd4 Bd2 39.Kb3 Be1 (39…b6 40.Ka4 Kc7 41.Nf3 Be3 is also possible) 40.Ka4 b6 41.Kb5 h5 and, as usual, white’s still pushing and black’s still hanging on.
* 32…f6!? 33.a3 (33.Nxg3 Nxg3 34.a3 Kc6 35.b4 axb4 36.axb4 b5 37.c5 Nh5 38.Kc3 Kd5 and White has absolutely nothing.) 33…Kc6 34.b4 b6 35.Nxg3 Nxg3 36.Nc1! (intending Kc2-d3-d4) and it’s still tough going for Black.
* 32…Bh4!? 33.Ne5 f6 34.Nd3 (34.Nd7+ Kc6 35.Nf8 Kd6 36.Nxh7 Ke7 with the old …Ke7-f7-g7xh7 idea.) 34…Bf2 35.Nxf2 Nxf2 36.Kc3 Kc5 37.a3 Nd1+ 38.Kd2 Nf2, =. All these defenses share the same theme: they strive to get that poor abused Bishop back into the game before it’s too late!
33.a3!
Far worse is the forcing 33.Ne5? f6 (33…Ng3? 34.Nc3 Nh5 35.Nd5+ Ka6 36.Nd3 leads to serious progress for White) 34.Nd7+ (34.Nf3 Bg3) 34…Kc7 35.Nf8 Kd6 36.Nxh7 Ke7 (intending to win the Knight by …Ke7-e7-g7xh7) 37.g4 fxg4 38.hxg4 Kf7 39.g5 f5 40.Kd3 Kg7 41.Nf6 Nxf6 42.gxf6+ Kxf6 intending …g6-g5 is drawn.
33…f6 34.b4 axb4 35.axb4 Ng3 36.Nxg3 Bxg3 37.Kc3
White’s queenside pawns, King, and Knight will now sweep his opponent off the board.
37…Bh2 38.Kd4 Kc6 39.b5+ Kd6 40.c5+ Ke6 41.Kc4 g5 42.b6 gxf4 43.Ne1 f3 44.Nxf3 Bb8 45.Nd4+ Kd7 46.Nxf5 Ke6 47.Nd4+ Kd7 48.Kd5 Be5 49.c6+, 1-0.
Now compare the pawn structure of the game you just looked at with the pawn structure of the game that follows. It's identical. If you want to master your openings, you need to understand every nuance of the resulting pawn structures.
Mr. Pekar, you lost the game by entombing your Bishop. By the time you freed it, White had managed to make too much queenside progress. In your intro, you mentioned that your compensation for the doubled f-pawns was active pieces and the Bishop vs. Knight imbalance. However, at the end of the game his Knight turned out to be far more versatile than your Bishop (the Knight’s ability to hit both white and black squares proved more important than the Bishop’s long range powers), and before that basic Bishop vs. Knight battle ensued (when it was already too late), the placement of your Bishop on h2 relegated it to passivity (not the activity you said you were striving for).
SUMMING UP
Your opponent simply outplayed you – he achieved his goals (trading pieces, making his remaining Knight better than your Bishop, placing his pieces on ideal squares, getting his queenside pawn majority rolling, and dampening the activity of your minor pieces and King) and you failed to do so (you allowed your minor pieces to get bogged down, which let White do all the good stuff mentioned above). It happens to everyone (beginners and grandmasters alike).

