Philidor Position d/e-file(Rook End Game)
This blog/video is about Rook end game – Philidor Position.
When you are one pawn down and both you and your opponent left with one Rook each. Pleasure of taking win from the hands of your opponent by forcing a draw is really something different. If you want to master this trick then, Philidor position method must be there in our bag of tricks.
The study of Francois-Andre Danican Philidor (1726-95), showed how to correctly defend these types of endings.
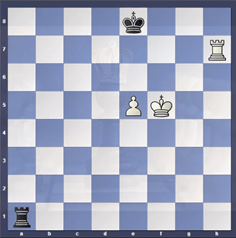
 The defender is given the ideal situation: King sits on the passer pawn's promotion square. To make a draw, it is necessary that the blockading King isn't forced away.
- ... Ra6!
- Rg7 Rb6
- Ra7 Rc6
- Rb7 Ra6
- e6 Ra1
- Kf6 Rf1+
- Ke5 Rel+
Practice this position against a friend, then you will realize that the draw is now easy.
The Philidor method of defense works against all pawns positions, meaning that the superior side cannot tolerate a blockading King at promotion square.
Details analysis of the above Diagram is done in the following video.
Philidor Position d/e-file Video Part -I
Concept of Short Side vs. Long Side
Basic principle for Philidor Position
- i) The defending King is only one file away from the pawn.
- ii) The defending Rook is three files away from the pawn.
When the blockading King is forced away from the promotion square-in the above case, e8. It is best if the blockading King moves to the short side (in this case King Side) of the passer. In the case of a passed d-pawn, the short side would be the Queen Side.
The defending king should be moved towards short side because of defensive Rook. When the blockading King is forced to flee the promotion square, the defending Rook has to give checks from the side as far as possible, on the ranks of the board, instead of from behind/files.
If the defender is unable to check from the side, the attacker will set up the Lucena position and win. The defender needs to check from the long side of the board, where the Rook will be more effective.
 The above diagram is a bit of an anomaly. Usually, when the defender's Rook isn't three files away, the game is lost. But this position can be forced to draw.
- ... Rb7+
- Kd6 Rb6+
- Kd7 Rb7+
- Kd8 Rb8+
- Ke7 Rb2
- Rf1 Ra2
- e7 Ra7+
- Kd6 Ra6+
- Kd5 Ra5+
- Ke6 Ra6+
- Ke5 Re6
Few more examples are also explained in the following video.
Philidor Position d/e-file Video Part -II
Principles: A Recap
- In the Lucena position, building a bridge wins.
- In the Philidor position, keeping the Rook on the sixth rank or third rank draws.
III. When the blockading King is forced away, go to the short side and move your Rook three files away from the passer.
- When playing against a lone pawn, count the tempi.
- Keep in mind the crooked path and how to win a tempo with a Rook check.
Such Rook endings will be played by you countless times in tournaments. If you are a pawn down then you can easily force a draw. If you are a pawn up then you can win if you know the proper technique.
Rook ending can be very tricky. The thumb rule is always place rook behind the passer either you are attacker or defender.
If you want to learn how to win the chess games, then you must know how not to lose the game. Sometimes forcing a draw tastes much bitterer to your opponent, when he was on edge of winning and you forced him a draw.
