Kopaev's Instructive Endgame
This position by Kopaev is practical and instructive. If your goal is to be a strong tournament player, this is a great position to understand.
You've seen the moves, but perhaps the reasons for them are not so obvious. Read on, and I will explain them. Feel free to ask questions. :)
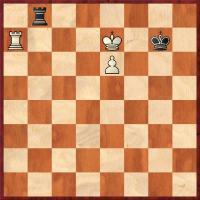
Idea #1: According to Kopaev, "When the [defending] king is cut off two or more files from the pawn, [the attacker] always wins." White to move with the rook on a1, a2, a3, a4, or a5 is a trivial win. For example, 1.Rg3+! Kh7 and White wins per the above rule, hiding behind his pawn to shelter his king from checks.
Idea #2:
Black's king is ideally placed on g7. From there, he controls the f6, f7, and f8 squares, so White's king can't seek shelter from rook checks by fleeing to the kingside. Also, his king is only two moves away from the queening square.
Black's rook is on the best square possible on the b-file. Of course, being on a8 would be an improvement over b8, but that's just not possible. On b8 it at least prevents the White pieces from advancing to the eighth rank.

Black's in zugzwang! That's a fancy way to say, he can't move without making his position worse. So, White needs to find a clever way to pass the move. And that clever trick is called triangulation, as seen below.
Black can pick his poison (worsening move), but here he misplaces his king, 3...Kg6.
Idea #3 - White now moves his rook to a1, preparing to support his passed pawn or cut-off Black's king. Black does the only natural thing in this position... he checks!
Unfortunately his checks are doomed to failure. There are only 2 squares between his rook and the pawn. A successful defense of this sort requires 3 squares... aka checking distance. White capitalizes on Black's misfortune in a typical manner.
Idea #4: The final decision for White is whether to use his rook to (a) cut-off Black's king or (b) support his pawn. If you calculate just a couple moves ahead, you'll see the cut-off approach goes nowhere. The support approach yields fantastic results!


