Play it Out. Part 1: The Challenge of the First Move
Last week after I assigned two positions to play out, I had no idea that just one would have been more than enough. The positions turned out to have tons of interesting hidden resources that my sparring partner, IM David Pruess, and I successfully explored. David, who is also a chess.com admin, was kind to offer his help playing through the endgames. We set up the position so the clocks only started after the first move, therefore the first move was made only after about 1 min thinking. The first two times we tried we didn't make the best first moves. This only shows that even a player with great experience such as an IM or WIM does not always get the feel for the position and the correct plan right away. It takes time to dig deeper; it takes long analysis to grasp all the nuances of the position. We had about 20 min per side but ended up spending less than 10 min. This is the difference of a practical/internet game vs. an OTB game: it is hard to take the game as seriously as a tournament game. Nevertheless, after making a few mistakes we came close to the truth of the following position.
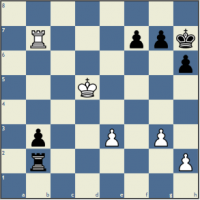
It is white to move, and David chose to defend as white in the first game. Black has an extra passed pawn and better pawn structure on the kingside. Black’s rook is passive, while the activity of the white rook and the king somehow compensates for the extra pawn that black has. Black can check with Rd2 and push b2 making the rook more active. Against this threat David is defending with the first move. Black defends the f7 pawn with the king move. This first game is an example of what happens when white tries a passive defense: by keeping the king near the kingside pawns and not trying to find counterplay. In many endgames this would be the right strategy, but in this position it does not work since black manages to create a second weakness on the kingside, while threatening the king march to support the b pawn.
Let us draw some conclusions from the game:
- The passive defense by white does not hold.
- Black has two main ideas: advancing the kingside pawns or bringing the king over to the queenside.
- Black has two ways of defending b pawn: keeping the rook on the 2nd rank and defending it from the side or keeping it on b1, while the pawn on b2.
The next game we switched sides and based on the first game we had already some ideas of how to attack and defend. The next game features white’s main counterplay: the advance of the e pawn. It also shows the play if black keeps his rook on the second rank – more actively, instead of keeping it behind the pawn.
The ideas that we learned from the game:
- When black keeps the rook on the second rank and in this way protects the b pawn, he has an idea of giving up the b pawn for two white pawns on the kingside.
- When black tries to break through with the king on the queenside white must bring the king to block the black king's entrance there.
- White's only counterplay is to push the e pawn; black has to be careful to not allow this to happen.
- Even with an equal amount of pawns on the kingside, one can get in trouble if the king is too far away.
The next article will show more ideas and our further games as well as the analysis published in the "Informant" by Mikhalchishin. You still have a second chance to play out this position. I hope you have as much fun as we did playing out this endgame!


