Going Crazy!
Going Crazy
A few weeks ago, I wrote a blog on solo chess, and I got a lot of requests for me to try crazy mode. Little did I know, crazy mode is absolute madness.
Puzzle 1
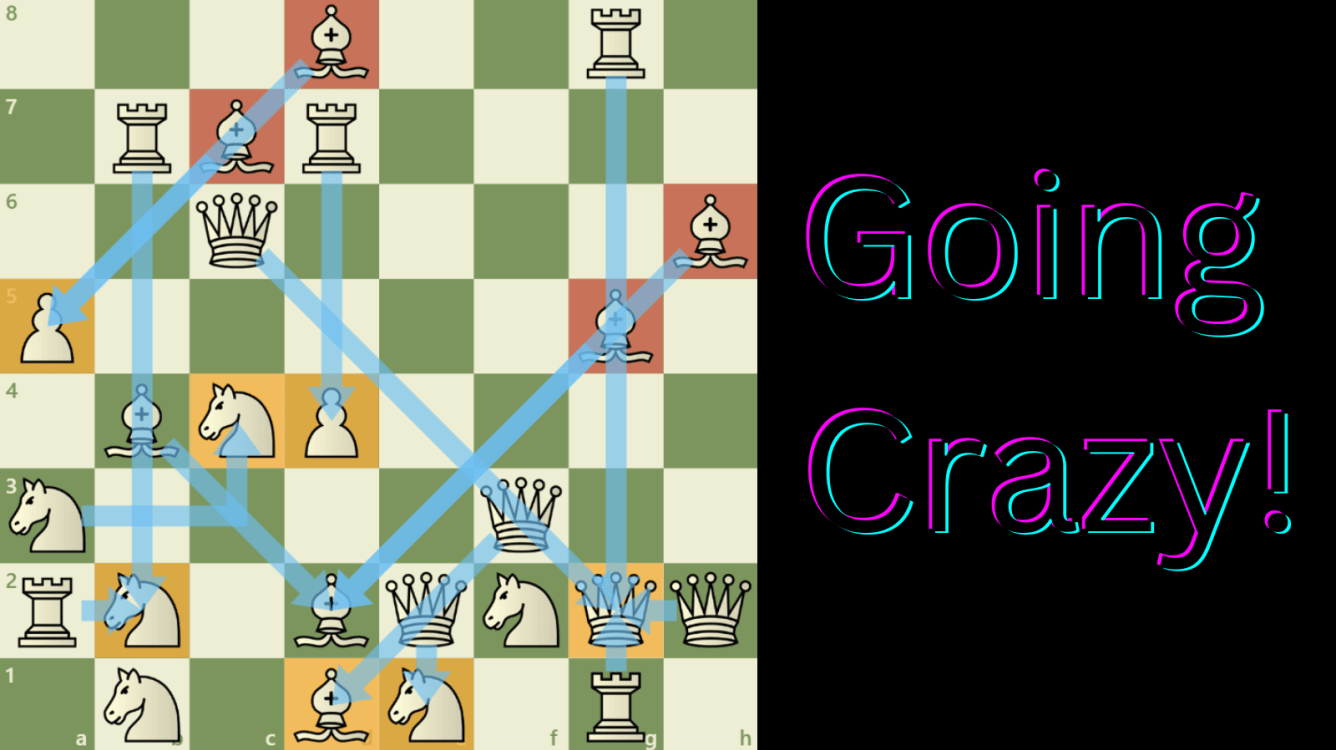
The first puzzle looks like a whole bunch of different things are happening. However, you can see a broader pattern in this puzzle, which is that most of the bishops, rooks, and queens are able to converge onto a single square: c5. Additionally, this square is within line of sight of the king. Remember, in solo chess, the king has to be the last piece to capture and remain (If you don't know the rules, you can check out my blog on solo chess or go try it out yourself under the features tab of chess.com).
However, there are a few pieces that need special attention. The first is the knight on b2, but it can reroute to the c5 square by taking on a4 first. A similar thing with the knight on g5, having to capture the rook before getting to c5. Other pieces also have to be the first to reroute to one of the diagonals or rows that was highlighted in the first diagram such as the queen on g4 and the rook on e8. However, after these pieces converge, you can simply have all the other pieces converge on c5 for the king to pick up.
Puzzle 2
The next puzzle is a little more complicated because of how many knights there are. However, similar to the first puzzle, there is a pattern once again. If you look at the pieces with long range, the queens and bishops, you can see that most of them have a common point of intersection, which is on c4. This means that the objective of the puzzle is to try and get your pieces in that area.
And once you break down the knight's movement, you'll see that all of the knights can directly jump to c4, except for two knights, which are on e4 and c2. However the knight on c2 can be picked up by the queen, while the knight on e4 can pick up the stray pawn and reroute to c4. This leaves only the bishops on b1 and e8 without a direct line of vision to c4. However, even these pieces can get onto the diagonals that direct to c4 by being the first pieces in the sequence to capture, and then go to c4.
Puzzle 3
The next puzzle is a bit more spread out, but the pattern continues by looking at the long range pieces first, and seeing their point of intersection. In this case, it would appear that most of the long range pieces are converging on e6 (you might be picking up on the steps to solve these kind of puzzles).
Now, we look at the knights, and we see that two of the knights can directly go to e6. However, the knight on b7 has to jump to d8 because that bishop is stranded without any obvious moves, and from d8, the knight uses its second move to route onto e6. Finally, the bishop on a4 has to be the first move to capture on d7 in order to ensure that the bishop is on the diagonal that converges onto e6.
Puzzle 4
This puzzle is gets harder because of how many pawns that are hanging across the board. However, we can still apply our main strategy and see the most of the long range pieces are going to converge onto c4.
By looking at the diagram, you can see that most of the pieces are able to capture a pawn to reroute towards c4. It is worth noting that the knight on b1 has to capture the queen in order to get to c4, which leaves the rook on b5 as the only available piece to capture the pawn on b4.
Puzzle 5
This puzzle is a bit more unique because you can see that certain pieces don't have any possible way to capture. This means that some pieces will have to be captured in order to make progress. Applying the same principle, we've been using, we can see that most of the long range pieces will converge onto f1.
There are a few ways to get the bishop on c8 to f1, but I choose to take on h3, but taking on the rook may be faster. The knight on e4 must also be the first to capture in order to ensure it has a path to f1. The interesting part is with the bishop and knight that can't move on the f file. But note that they are on the line of vision to f1, and they can both be captured by queens. This means that each queen has to use their first move to capture these pieces, and then use their second move directly to f1. This means that the queen on f6 has to capture f1 before the other queens.
Bonus Puzzle!
This puzzle is a lot harder because it isn't as obvious at what point the pieces should be intersecting. For example, g2 looks like a plausible point of intersection to converge on. So in this case, I also decided to look at the knights in conjunction with the long range pieces, and if you account for the knights ability to reroute to certain, squares, you can see that more knights are easily able to converge onto d2 rather than g2.
There is a specific order that goes into this puzzle. The bishops on c7 and d8 have to both capture on a5, and then the dark square bishops all have to converge onto d2. This opens up files for the rook on b7 and g8 to converge onto b2 and g2. From, there, long range pieces should converge onto b2 and g2, and then use their second move to converge onto d2. The knight on a3 should pick up c4. The queen on e2 also has to pick up the knight on e1, while the queen on f3 has to pick up the stranded bishop on d1.
But what are your thoughts on crazy mode of solo chess? I know that it makes my blog look short even though I spent over an hour on it. But let me know your best records on crazy mode!