
The Queen’s Gambit (How to play it, Attack it, And counter it)
Hey guys! Ready for a brand new post in my blog? Today we are talking about the Queen’s Gambit. I meant the chess opening. Not the drama. So don’t get confused about that. Thank you so much for your comments about my previous post ‘how to defeat Martin’. If you haven’t checkout my blog yet, visit me 👉 Raven Ivy Serena’s Blog. So without further due, let’s jump right in to our today’s topic ‘The Queen’s Gambit’.
Overview
The Queen's Gambit is a chess opening when the following moves are played:
1. d4 = To start the Queen’s Gambit, White moves this pawn forward.
d5 = Black responds by moving this pawn forward.
2. c5 = White counters by moving this pawn up two squares.
In the Queen's Gambit, White is trying to exchange his Queen’s pawn.
For Black's center pawn.
By doing this, we reach the Queen’s Gambit opening.The idea behind the Queen's Gambit is: White is trying to exchange his wing pawn (the c-pawn) for a centre pawn (Black's d-pawn).
If this is done, then White proceeds to dominate the centre with his King pawn.
If Black takes Whites Queen’s pawn, White can gain control of the e4 square
Despite its name, the Queen's Gambit is not a true gambit, since Black cannot hold the pawn:
The Queen’s Gambit is not a TRUE gambit. Because White never really sacrifices this pawn. After Black takes, White can just free up his bishop.
When black tries to keep the pawn, he won.
The Queen's Gambit is divided into three major categories based on Black's response
The Queen's Gambit Accepted (QGA)
The Queen's Gambit Declined (QGD)
And the Slav Defence
There are three responses to the Queen's Gambit...
If black takes the pawn...
The opening becomes the Queen’s Gambit Accepted
If black protects the pawn with his King pawn
The opening becomes the Queen’s Gambit Declined
And If black protects the pawn with his King's Bishop pawn
The opening becomes the Slav Defense
In the QGA, Black plays 2...dxc4, temporarily giving up the centre to obtain free development.
In the QGD, Black usually plays to hold d5 but has to block his bishop in.
Frequently Black will be cramped and will need to aim to exchange pieces and use the pawn breaks at c5 and e5 to free his game.
While in the Slav, Black also plays to hold d5 but doesn't have to block his bishop in.
What is the Queen’s Gambit?
The Queen's Gambit is a popular chess opening that occurs in 1 out of every 8 chess games.
It consists of three moves.
You can see what it looks like below.

The Queen’s Gambit is a chess opening
When the board looks like this...☝️
You are in the Queen’s Gambit Opening
How to reach the Queen’s Gambit?
You can reach the Queen's Gambit opening by making three moves.
First, move your queen’s pawn forward to squares.
Then move Black's queen pawn two spaces forward.
Finally, move your queen sides bishop pawn forward two squares.
In chess notation this is written as:
d4 d5
c4
Why play the Queen’s Gambit?
White chooses to play the Queen’s Gambit because it gives him the opportunity to exchange his wing pawn to gain more control of the center.
This leads to positions where White can constantly put pressure on his opponent.
The Queen's Gambit can force black to either lose control of the center or having to play in a cramped position.
White plays the Queen’s Gambit because he gets to trade his wing pawn for a center pawn.
Why is it called the Queen’s Gambit?
The Queen's Gambit is called a Gambit because White is "sacrificing" his c-pawn in order to get a better control over the center.
Note that this sacrifice is not permanent and White can easily get back the pawn he's sacrificed.
It’s because here, White is Gambiting his Queen’s pawn.
A Gambit is when you give your opponent a free pawn....
In hopes of some counter play later.
Black can just take Whites Queen’s pawn
For that free pawn...
White will try to exploit his space advantage on the Kingside
While black will attack on the queenside

What is the Queen's Gambit Declined?
The Queen's Gambit Declined is one of Black's three responses to White's Queen Gambit opening.
Instead of accepting White's wing pawn, Black chooses to secure his center pawn instead.
Black focuses on controlling the center with the trade off of accepting a cramped position.
This is Black's most popular reply to the Queen's Gambit Opening.

When White pushes this pawn forward two squares...
Black has three ways to counter this.

If Black chooses to counter White’s move by doing this...
This counter move is called the Queen’s Gambit Declined.

By playing this move, Black does block his own bishop in

But in exchange, this pawn is protected
What is the Queen's Gambit Accepted?
The Queen's Gambit Accepted is one of Black's three responses to White's Queen Gambit opening.
Black chooses to accept White's wing pawn for his center pawn.
With the idea being to temporarily not worry about controlling the center, but increasing mobility for his pieces.

When White moves this pawn forward two squares...
Black has three ways to counter this.

One way would be to just take white’s pawn...
This is the Queen’s Gambit Accepted opening
Here, white will try to exploit his space advantage...
While black will attack on the queenside.
Is the Queen's Gambit Accepted Playable?
Yes!
This opening is considered sound and some of the most elite players in the world play the Queen's Gambit Accepted.
Every Move Explained
Albin Countergambit
How To Reach It
The Albin Countergambit is a chess opening that begins with the following moves:
d4 d5
c4 e5
dxe5 d4
See these moves played out below:

To play the move: Albin Countergambit
White starts by playing a Queen's Gambit

White first move is to push this pawn forward two squares.

Black responds by moving this pawn forward.

And then white moves this pawn up two squares.
This position here is the Queen's Gambit.
Black has a few ways to respond to the Queen's Gambit.

If Black moves this pawn forward two squares...
This move is known as the Albin Countergambit

White only real option here is to take this pawn

And then Black counters by moving this pawn one square forward.
This is main position in the Albin Countergambit
Why play the Albin Countergambit
In the Albin Countergambit, Black lets White take a pawn with the idea of pushing his d pawn one square forward.
That way this pawn can be used as a wedge for Black's counter attack.

So this is the main move for the Albin Countergambit

Here black is letting White take a pawn

With the idea of pushing this pawn one square forward.
To counterattack White.
White's Moves
Castle Kingside to Protect the King
Normally in the Albin Countergambit, White castles kingside to protect his King, While black castles Queenside.
 Castle Kingside to Protect The King
Protect Pawn using Kingside Knight
The job of this knight is to defend the pawn on e5.
So black normally tries to remove the defender of this pawn with his bishop.
So black normally tries to remove the defender of this pawn with his bishop.
So what White does, is place his other Knight so in case of an exchange, the pawn on e5 is still defended.

White has Knight here to protect his e5 pawn

So black normally tries to remove the defender of this pawn with his bishop

So what White does, is place his other Knight here

So if Black does try an exchange

White can just replace the defender
Replace Kingside Knight with Queenside Knight in case of trade
Typically Black will place his light squared bishop and try to trade it off for White's kingside knight.
With the idea of getting rid of the defender for the e5 pawn.
So if we White places his Queenside knight on d2, even if his Knight on f3 is traded off...
The Knight on d2 can just take its place.

Have Queenside Knight back up King Side Knight in case of trade
Place bishop on long square diagonal
So typically, White will place his bishop on this long diagonal.
The idea being to attack Black's Queenside when Black castles that way.

White will place his bishop on this long diagonal

Since normally Black will castle Queenside

And this bishop will attack the long diagonal the King sits at
Black's moves
Castle Queenside to Protect the King
Normally in the Albin Countergambit, White castles kingside to protect his King, While black castles Queenside.

Castle Queenside to Protect The King
Attack White's e pawn using Queen Knight
The job of White's knight is to defend the pawn on e5. Black's job is to attack and put pressure on this e5 pawn.
This is normally done with Blacks Queen's Knight. With enough pressure, from enough pieces, this e5 pawn can fall.

White has Knight here to protect his e5 pawn
So black normally tries to attack this pawn on e5
With enough pressure, from enough pieces, this e5 pawn can fall.
Try and exchange bishop for White's knight
Typically Black should exchange his light squared bishop and try to trade it off for White's kingside knight if he gets a chance.
The idea of getting rid of the defender for the e5 pawn.

Black should try and exchange his bishop for White's knight
Since this will remove the defender of White's e5 pawn
Queen’s Gambit Declined
How To Reach It
The Queen's Gambit Declined is a chess opening that begins with the following moves:
d4 d5
c4 e6
This is known as the Orthodox Line of the Queen's Gambit Declined. When the "Queen's Gambit Declined" is mentioned, it is usually assumed to be referring to the Orthodox Line.
See these moves played out below:

To reach the Queen's Gambit Declined
White starts by playing a Queen's Gambit
White first move is to push this pawn forward two squares.
Black responds by moving this pawn forward.
And then white moves this pawn up two squares.
This position here is the Queen's Gambit.
Black has a few ways to respond to the Queen's Gambit.
If Black moves this pawn one square forward...
This is main position in the Queen's Gambit Declined
Why play the Queen's Gambit Declined
The Queen's Gambit Declined has the reputation of being one of the best defenses against the Queen’s Gambit and is played at the highest levels of chess.
White's Moves
Use Queen’s Knight To Put Pressure on d5 pawn
As White, we should place our Queen’s Knight on c3 with the idea being to attack Black’s d5 pawn.
If White can load up enough attackers on d5, then the d5 pawn will fall.

As White, we should place our Queen’s Knight here
The idea here being to attack Black’s d5 pawn
If White can load up enough attackers here...
Then this pawn will fall
Use dark squared bishop to pin Black’s kingside knight
Black will try and place his King’s Knight on f6 to protect the pawn on d5.
When Black does this, White should move his Bishop to g4. Doing this leaves Black’s knight pinned and can’t defend the d5 pawn anymore, since if it moves, the Queen is under attack.
Black will try and place his King’s Knight here...
To protect this pawn on d5
When Black does this...
White should move his Bishop here…
Now Black’s knight is pinned
Now Black’s knight is pinned
Since if it moves, the Queen is under attack
Point light squared bishop to attack Black’s Castled King
Since Black normally will castle Kingside, so what So white should do is first push his king pawn forward one square, and then swing his bishop to d3.
That way, White’s bishop will directly attacks Black’s King.

Black normally will castle Kingside...

So White should first move this pawn forward one square
And then swing his bishop here
So it directly attacks Black’s King
Black's moves
Use Queen’s Knight To Backup Kings Knight on d7
Black place his King’s Knight on c6 to defend the d5 square and pawn.
Then White normally move his Bishop to g4 to try and pin the Knight on c6 and make it so it can’t defend the d5 pawn anymore.
To counter this: Black should move his Knight to d7.
That way if White takes the Knight on f6, Black can place his other Knight back on f6 and still keep d5 protected.

Black should try and place his King’s Knight here…
To protect this pawn on d5
White could then move his Bishop here
So Black’s knight is pinned here

And can’t defend the d5 pawn anymore
To counter this: Black should move his Knight here
That way if White takes
Black can place his other Knight back here
And still have d5 protected
Attack c3 Knight
So normally, White place his Queen’s Knight on the c3 square to try and attack and win the d5 pawn.
Black should try and launch a counter attack on this Knight on c3.
This is done by first pushing the queen’s bishop pawn on c7 forward one square to c6.
So the Queen can swing out to the a5 square and attack the d1-a5 diagonal.
Then black should swinging his dark squared bishop to b4 to further attack the d1-a5 diagonal.
And finally bringing the King’s knight over to e5 to really exploit this pin and launching a dangerous attack.

So normally, White place his Queen’s Knight here
To try and attack and win this d5 pawn

As black, we can launch a counter attack on this Knight...

The idea being to first push this pawn one square forward

So the Queen can swing out here

And then swinging the dark squared bishop here

And then bringing the Knight here
Threatening a huge attack here
Queen’s Gambit Accepted
How To Reach It
The Queen’s Gambit Accepted is a chess opening that begins with the following moves:
d4 d5
c4 dxc4
See these moves played out below:

To start the Queen’s Gambit Accepted opening...

We first start by playing the moves for a Queen’s Gambit

Black counters like usual

And then White initiates the gambit
From here to play the Queen’s Gambit Accepted...

Black takes White’s pawn
Why play the Queen's Gambit Accepted
The Queen's Gambit Accepted is the third most popular option against the Queen’s Gambit (with the Queen's Gambit Declined being the most popular and the Slav Defense coming in second).
In this move, Black surrenders fighting for the center and instead opts to let White have it.
Black will then try to weaken White's center pawns to gain an advantage in the ensuing endgame or White an isolated pawn on d4 weakness – which can be used to counter attack during the middlegame.
White's Moves
Take back pawn by pushing e3
As White, if we want to take back the pawn on c4 immediately, we can only do so by pushing this pawn one square forward to e3.
If we push this pawn to e4, we give Black the chance to keep this pawn.

As White, we want to take back this pawn

But we can only do so by pushing this pawn one square forward...

This frees up our bishop

So it can take the pawn next turn

If we push this pawn two squares forward, however...

Black will be able to keep this pawn

By pushing this pawn forward two squares
Push queenside pawns forward to break apart black’s pawn formation
Black will try to use this Queenside pawns to try and protect the pawn he won on c4.
So White should push his queenside pawns forward to break apart Black’s pawn formation.

Black will try to use these pawns

To protect the pawn on c4

So White should push these pawn forward...
To break apart this formation
And when White takes this pawn...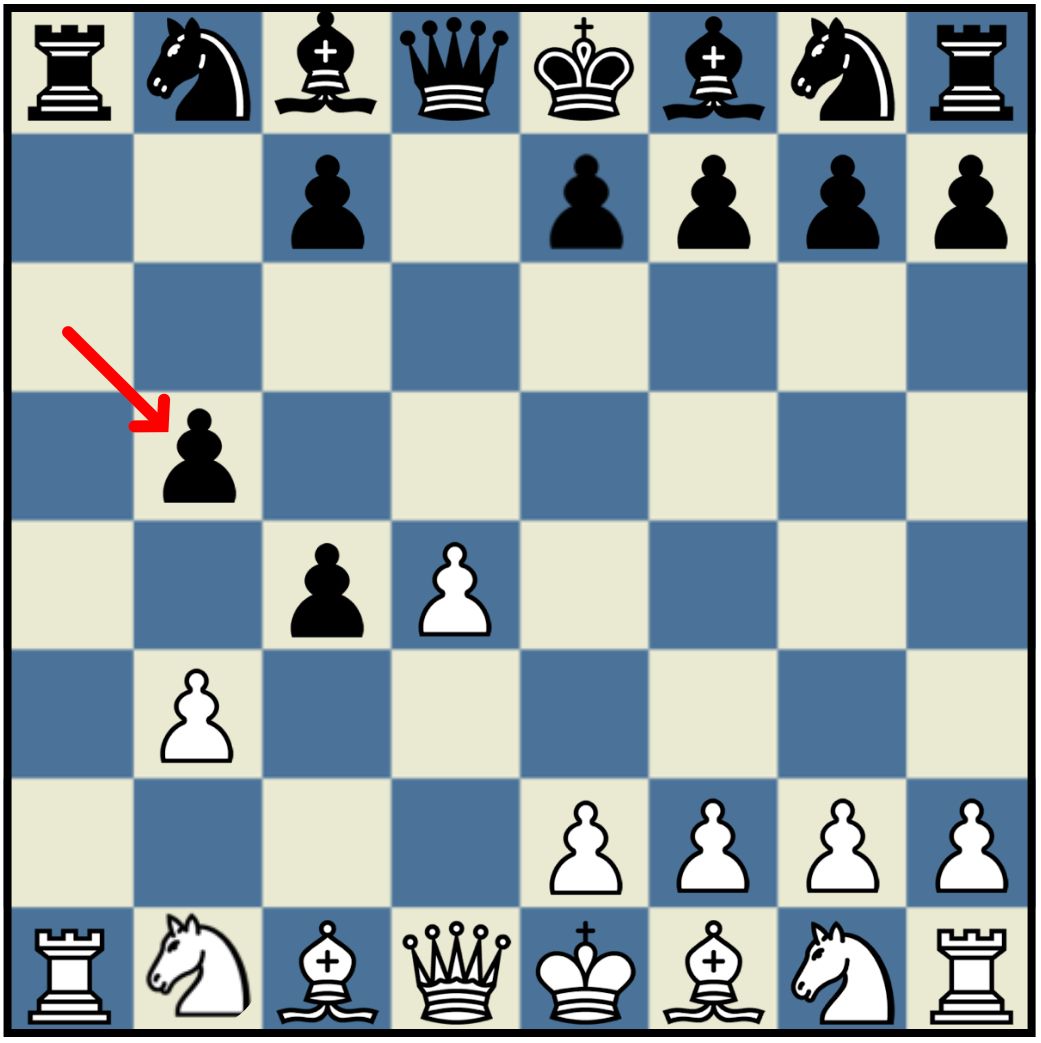
Black can’t take back

White can just take the free rook
Black's moves
Setup Queenside Wall
Black should try to use his Queenside pawns as a wall to protect the pawn he won on c4.

As Black, you should try to use these pawns
To protect the pawn on c4
Place Dark Squared Bishop on Long Diagonal
Black should also place his bishop on b7 so it controls the long a8-h1 diagonal.
White could then move his Bishop here
So Black’s knight is pinned here
OMG 😱! That was a super duper long article. This article is my so far best and the longest. So thank you so so much for reading this. Hope you enjoyed and learnt something from this post. If you did, follow me to notify when I, publish a brand new post for you. So definitely, that’s it for today guys thank you for reading! See you in the next one! Byeeeeeee 🙋♀️!