
Mastering the Endgame - Part Two
This post is Part Two of my journey through the systematic Endgame study book, Silman's Complete Endgame Course: From Beginner to Master. Here's a link to this book on Amazon: https://www.amazon.com/Silmans-Complete-Endgame-Course-Beginner/dp/1890085103. Go buy it! It's fantastic and well worth your money! All of the concepts and diagrams mentioned in this series come straight from the book, and are not my own (I've simply compiled them into a shortened blog format). And any time I directly quote Jeremy Silman from the book, I'll put it in quote marks.
But before we begin this section, below are the answers to the test positions from Part One.
PART ONE TEST - ANSWERS:
Position 1: White to move - "White has a forced mate in four"
Answer: 1. Rb6! Kf7 2. Ra2! Ke7 3. Ra7+ Kd8 4. Rb8# (Alternative 1. Rf3! Kg6 2. Rg2+ Kh5 3. Rf4 Kh6 4. Rh4#)
Position 2: White to move - "Is it wise to play 1. Rc7, trapping the enemy King on its back rank?"
Answer: No. 1. Rc7 instantly draws the game via stalemate, because presently the black K's only legal square to move to is h7, and 1. Rc7 takes even that square away from the black K without putting the black K in check. So the best move in this position is 1. Rc1, because after 1...Kh7, white delivers mate with 2. Rh1#.
Position 3: White to move - "Trap the enemy King in the smallest possible Box."
Answer: 1. Re4! preventing the black K from stepping onto the e-file and the 4th-rank.
Position 4: White to move - "How do you finish Black off?"
Answer: 1. Rg7! placing black in a zugzwang position, because if black continues with 1...Ka8, white wins in 2 moves with 2. Kb6 Kb8 3. Rg8#. And if black continues with 1...Kc8, white wins instantly with 2. Rg8#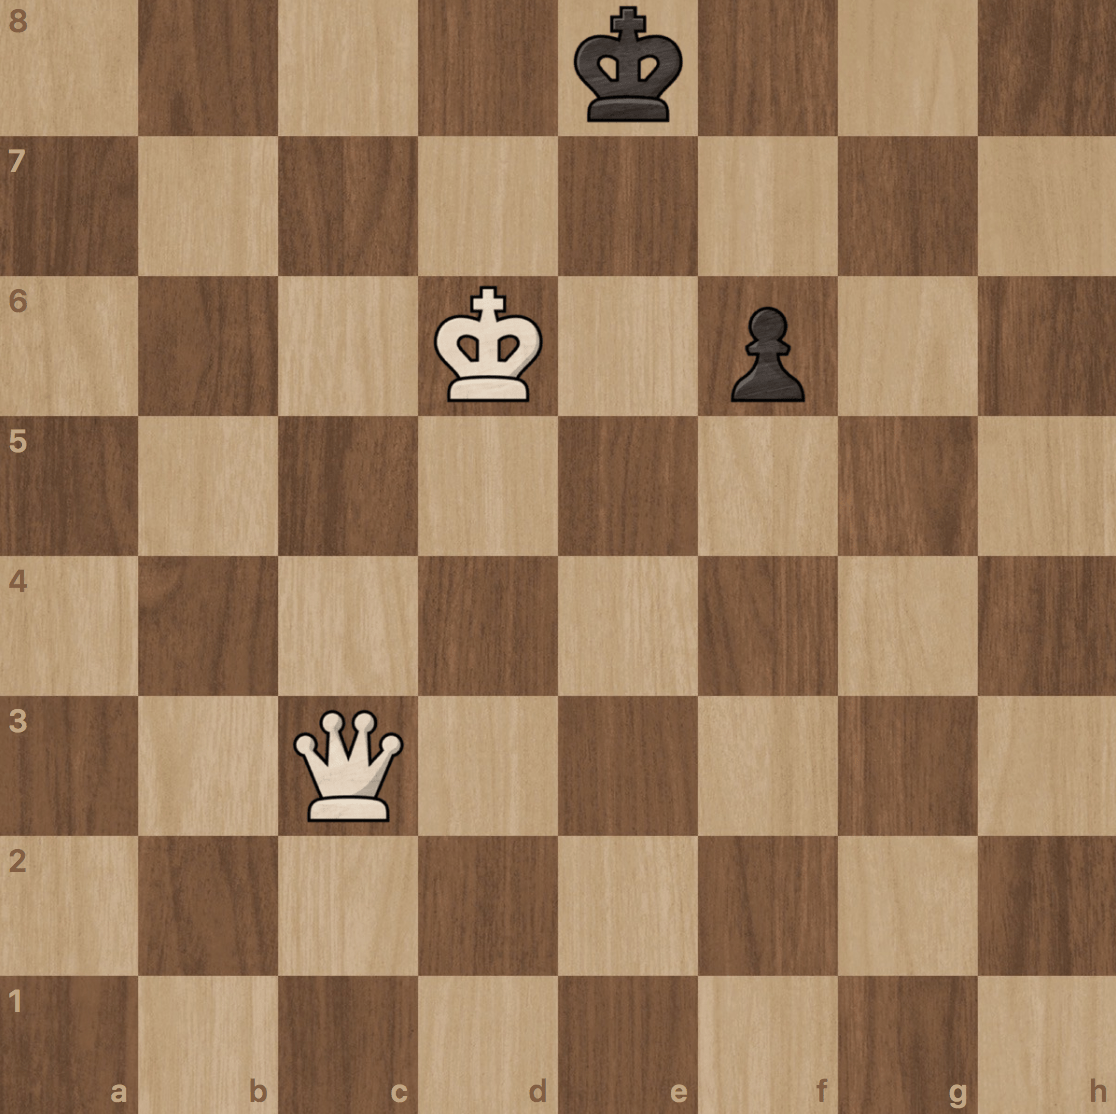
Position 5: White to move - "Can White safely take the pawn on f6 with his Queen? Should he do so?"
Answer: No. 1. Qxf6?? instantly draws the game via stalemate, because presently the black K's only 3 legal squares to move to are d8, f8, and f7, and Qxf6?? takes all 3 of those squares away from the black K without putting the black K in check. So the simplest and most logical move for white in this position is 1. Qc7, keeping the black K trapped on the back rank until an unstoppable mate is delivered just a few short moves later.
Position 6: White to move - "It's mate in one, can you find it?"
Answer: 1. Rg8#
Mastering the Endgame
Part Two: 1000 - 1199
Concepts included in this section:
WHAT CAN MATE VS. LONE KING
BISHOP VS. QUEEN
KNIGHT VS. QUEEN
USE YOUR KING
OPPOSITION
ROOK-PAWNS
____________________________________________
WHAT CAN MATE VS. LONE KING - Below is a chart of pieces, next to if that piece/combination is sufficient material to checkmate a lone K (if played properly).
Advice for the person with the Lone King, when defending against 2 Knights and a King: "Make sure you dance away from [the corners] (and/or away from the enemy King) whenever possible and you'll be completely safe."
BISHOP VS. QUEEN
Bottom Line: "This is no contest! One poor Bishop can't hope to face off against a mighty Queen!"
Advice for the person with the Queen: "In a Queen vs. [Bishop] endgame, stay on [squares of the opposite color of the Bishop's control] as often as possible and the Bishop becomes a non-entity."
KNIGHT VS. QUEEN
Bottom Line: "As with Queen vs. Bishop, Queen vs. Knight is a fairly simple win, but here the Knight's strange leaping powers create some nasty forking possibilities!"
Advice for the person with the Queen: "A Knight can be tricky! If you're not paying attention, it can fork and win a Queen, so be careful!"
***Remember***
The general idea to keep in mind in the endgame when you're ahead in material with piece(s) capable of checkmating your opponent's King is to...
1. "Use your King and other [piece(s)] as a team."
2. "Chase the enemy King to the side of the board."
3. "Be patient!"
*****************
USE YOUR KING
Get your King to the center: "In the endgame, pawns and the Kings take on enormous significance. In general, when an endgame is reached, rush your King to the center of the board."
Pawn promotion is key: "Every King and pawn vs. King situation is all about one thing: can the pawn promote?"
OPPOSITION
"The quest for domination between two opposing Kings is called the Opposition, whereby one King tries to become stronger than the other. This diagram [below] illustrates the most basic and direct form of Opposition...Both Kings would like to advance and gain ground, and both Kings have moved into a position that prevents the other from doing so. In such a situation it is a disadvantage to have the move since you must give up control of one of the blockade squares [the red squares], and thus allow the opponent a way into your position."
If it was Black's turn, his K would have no choice but to give up control of one or more of the red blockade squares (c5, d5, e5), allowing White's K to maintain a one-square distance between him and Black's K (i.e. giving White's K the opposition). Ultimately, this would allow White's K to prevent Black's pawn from ever being able to promote to a Q, because White's K would permanently maintain the opposition and thus control of the square in front of Black's pawn. The game would end in a draw.
However, if it was White's turn, his K would have no choice but to give up control of one or more of the red squares (c5, d5, e5), allowing Black's K to infiltrate White's position and ultimately allow Black's pawn to promote to a Q, because Black's K is able to maintain control of the square in front of his pawn as his pawn advances.

Now let's look at the next diagram below to understand an additional aspect of opposition in a K + pawn vs. K endgame. In this position it's Black's turn to move now, which means that White's K has the opposition. However, unlike the previous position above in which the player with the pawn would easily go on to win if his K had the opposition, this one ends with a draw regardless which K has the opposition as long as Black's K stays in the same column as White's pawn (and occupying the square directly in front of White's pawn) whenever possible. So even if White has the opposition here and it's Black's turn, Kd6! prevents White from making any progress. The reason for this is because the only square White could move his K to in order to maintain the opposition after Black moves his K to d6 would be d4. But he can't, because his pawn is occupying that square.
So let's examine White's 4 move options here in response to 1...Kd6, to see why this game is a draw regardless whose turn it is: 1...Kd6! 2.Kc4 - This instantly gives Black the opposition once Black replies with 2...Kc6, allowing Black to permanently maintain control of the square in front of White's pawn each time White advances it. So White will never be able to promote it.
1...Kd6! 2.Ke4 - Same idea as with 2. Kc4. This instantly gives Black the opposition once Black replies with 2...Ke6, allowing Black to permanently maintain control of the square in front of White's pawn each time White advances it. So again, White will never be able to promote it.
1...Kd6! 2. Kc3 - At first glance it may seem like this option works unlike the choices we just mentioned above, because Black can't maintain the opposition (i.e. can't play 2...Kc5) since that c5 square is controlled by White's pawn. But a closer look reveals that Black can simply reply with 2...Kd5, plopping his K right in front of White's pawn again. And after White plays 3. Kd3, White's K is right back where he started and zero progress has been made.
1...Kd6! 2. Ke3 - Same idea as with 2. Kc3. At first glance it may seem like this option works, because Black can't maintain the opposition (i.e. can't play 2...Ke5) since that e5 square is controlled by White's pawn. But a closer look reveals that Black can simply reply with 2...Kd5, plopping his K right in front of White's pawn again. And after White plays 3. Kd3, White's K is right back where he started and zero progress has been made.
***Remember***
When you have a King and your opponent has a King and pawn...
1. Always try to keep your King directly in front of your opponent's pawn, and "when your King has to step away from the pawn, always go straight back!"
2. "Don't let [your opponent's] King step in front of its pawn unless you have no choice."
*****************
ROOK-PAWNS - A rook-pawn is a pawn on either the a-file or the h-file (i.e. the files on which the Rooks begin the game).
"In most endgames, the presence of [rook-pawns] gives the defending side drawing chances that normally would not exist. The reason for this resides in the diminished activity of any King that steps in front of such a pawn (since that King can now only move towards the center of the board-going the other way would make the poor monarch fall off the edge of the world). This diminished activity allows many stalemate possibilities that simply don't occur with other pawns."
To illustrate this, let's take a look at the diagram below. In both positions it's white's turn to move, and in both of them white has a passed pawn on the 6th rank with the K right next to it. However, in the left one white's pawn is on the g-file, and in the right one white's pawn is a rook-pawn on the h-file. Notice how in the left position after White plays 1. g7, Black is forced to play 1...Kh7, and after 2. Kf7, nothing can prevent white's pawn from promoting.
However, in the right position every possible move except for 1. h7, White has allows Black to respond with 1...Kh7, plopping his directly in front of the pawn and blocking it's path (thereby preventing White from making any progress). And if White plays 1. h7, the game instantly draws via stalemate, because Black has no legal move.
***Remember***
King and rook-pawns vs. lone King:
1. "If the defender's King gets in front of the pawn, the game will always be a draw!"
2. "In general, if you are defending a King and pawn endgame, the presence of rook-pawns enormously increases your chances for a successful (drawn) result."
In the endgame in general:
"Stalemates play an important part in the defender's hopes and must always remain in the stronger side's mind as something to avoid at all costs."
*****************
PART TWO TEST:
Position 1: White to move - "Does White have anything to worry about?"
Position 2: White to move - "Is Kf3 a good move?"
Position 3: Black to move - "Where should Black move his King?"
Position 4: Black to move - "Which King move is correct?"
Position 5: White to move - "Can White win?"
And if you'd like to see this content explained in video form in which Tom and I walk through this section together, here it is below: