How do you identify corresponding squares?

Sort:
ChungYin

Hi, I'm taking the interactive lessons on the site and I'm in the endgame session right now. I'm confused with this particular lesson, as it only tells you that "you have to move to this position because it is a corresponding square to that other position," but how do we identify the corresponding squares here?

kindaspongey

If White gets to d6, then Black is lost. Therefore, if White moves to c5, Black must move to d7 or e7. However, if White moves to c5 and Black moves to d7, then play can proceed Kd4 Ke7 Ke3 Kf7 Kf4 and Black is doomed. Thus, it turns out that, if White moves to c5, Black must reply by moving to e7. If White moves to d4, Black has to be ready to move to e7 and to be ready to fend off an attack on the g4 pawn. The only possibility is to reply to Kd4 with …Kf7. If White moves to e3, Black has to be able to get to e7 in two moves and be ready to defend the g4 pawn. Hence, Black has to reply to Ke3 with Kg6. If White moves to d3, Black has to be ready to reply to Kd4 with ...Kf7 and be ready to reply to Ke3 with Kg6. Hence, Black must reply to Kd3 with Kg7. Similarly, if White moves to c4, Black has to be able to move to e7, f7, and g7. The only possibility is f8. To summarize what we have so far:

The reply to Kc5 must be ...Ke7.

The reply to Kd4 must be ...Kf7.

The reply to Ke3 must be ...Kg6.

The reply to Kd3 must be ...Kg7.

The reply to Kc4 must be ...Kf8.

One can proceed in this fashion to find more corresponding squares in this somewhat contrived position.

ChungYin

@kindaspongey Thanks for the detailed explanation! This makes things clearer now. I will try to work out all the other corresponding squares in this example as a practice myself. 

ChungYin

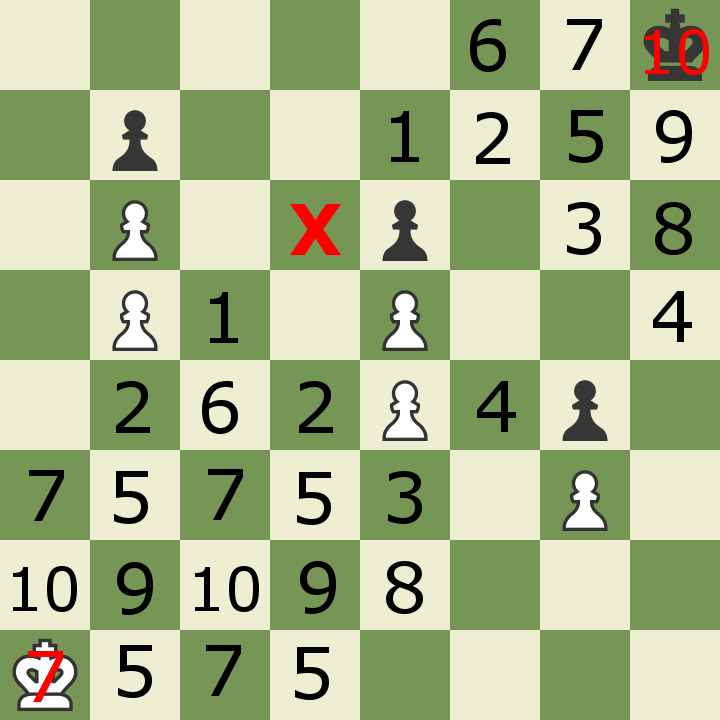
In fact, it becomes obvious which moves white should take after I've labelled all corresponding squares accordingly. h8 corresponds to a2, 1.Ka2 will force black to leave the corresponding square. If it's black to move, then 1...Kg7 since a1 corresponds to g8, then white has no winning chance.

kindaspongey

Congratulations. Here are some more positions that you might want to look at:

https://www.chess.com/forum/view/endgames/pawn-endings-emanuel-lasker-and-reichhelm

https://www.chess.com/forum/view/endgames/triangulation-troubles

https://www.chess.com/forum/view/endgames/king-and-pawn-endgame-2018-10-31

https://www.chess.com/forum/view/endgames/trouble-understanding-the-solution-to-this-problem

IpswichMatt

I did something similar to post 4 when I solved one of these recently - mapped out all of the squares and felt pleased with myself - but then I thought that there's no way I'd be able to do this in a game, since it's illegal to take notes and if you start writing numbers on the board your opponent may object.

Any tips how you can do this in an OTB game?

JamesColeman

@ipswichmatt


This guy (a GM) has an excellent explanation of corresponding squares that’s fairly easily digestible and relatable on a practical level. 


https://youtu.be/vXH5NJZfbFs


The position in #1 is an interesting composition but imo impractical - very difficult to replicate in an actual game as well as unlikely to occur. 

kindaspongey

I think there are some positions where the number of important related squares is fairly small.

https://www.chess.com/forum/view/endgames/triangulation-troubles

nexim
JamesColeman wrote:

@ipswichmatt


This guy (a GM) has an excellent explanation of corresponding squares that’s fairly easily digestible and relatable on a practical level. 


https://youtu.be/vXH5NJZfbFs


The position in #1 is an interesting composition but imo impractical - very difficult to replicate in an actual game as well as unlikely to occur. 

Holy hell mate. I've always struggled with this concept, but this guy finally gave me a clear explanation how the corresponding squares really work - in a way that I could actually use in a game. Of course in simple situations at first such as we all do (like if I do this, he has to do this) in any tactical position, but just realizing how far you can take the same concept in a fairly simple manner is just amazing. Definitely something to put on my bucket list of practice!

Thank you for sharing, what a great video!

IpswichMatt

@JamesColeman, thanks for posting that. I still found myself writing down the corresponding squares though even though there's only about 4 pairs of them in the video. Maybe this will come easier with practise - it seems ridiculous that I'd be unable to remember 4 pairs of squares.

IpswichMatt

There's  another example here with many corresponding squares:

https://www.chess.com/forum/view/endgames/pawn-endings-emanuel-lasker-and-reichhelm

I gave a lengthy explanation for how I'd calculate this, but again there's no way I could do it without writing it all down. I'm sure there's some memory technique which could help (map each square to a word - which you only have to memorise once and keep in long term memory- then form mnemonics in short-term memory to link the 2 words to remember the pair of corresponding squares... or something!).

But if the number of positions where there's a large number of corresponding squares really is very small in practise - as JamesC says - then maybe it's not worth bothering

ThrillerFan

Here's an article I wrote 2 years ago on the subject of Corresponding Squares:


https://charlottechesscenter.blogspot.com/2017/06/endgame-strategy-corresponding-squares.html

ljvankuiken

Can somebody post a link to the lesson the OP was referring to?

ljvankuiken

I found it. Thanks.

https://www.chess.com/mentors/view/442

joseph1000000
kindaspongey wrote:

If White gets to d6, then Black is lost. Therefore, if White moves to c5, Black must move to d7 or e7. However, if White moves to c5 and Black moves to d7, then play can proceed Kd4 Ke7 Ke3 Kf7 Kf4 and Black is doomed. Thus, it turns out that, if White moves to c5, Black must reply by moving to e7. If White moves to d4, Black has to be ready to move to e7 and to be ready to fend off an attack on the g4 pawn. The only possibility is to reply to Kd4 with …Kf7. If White moves to e3, Black has to be able to get to e7 in two moves and be ready to defend the g4 pawn. Hence, Black has to reply to Ke3 with Kg6. If White moves to d3, Black has to be ready to reply to Kd4 with ...Kf7 and be ready to reply to Ke3 with Kg6. Hence, Black must reply to Kd3 with Kg7. Similarly, if White moves to c4, Black has to be able to move to e7, f7, and g7. The only possibility is f8. To summarize what we have so far:

The reply to Kc5 must be ...Ke7.

The reply to Kd4 must be ...Kf7.

The reply to Ke3 must be ...Kg6.

The reply to Kd3 must be ...Kg7.

The reply to Kc4 must be ...Kf8.

One can proceed in this fashion to find more corresponding squares in this somewhat contrived position.


Isn't this discussion the same as "holding opposition "?

joseph1000000

Or you are talking about totally different problem? That I still am not understanding anyway?

kindaspongey
joseph1000000 wrote:
kindaspongey wrote:

If White gets to d6, then Black is lost. Therefore, if White moves to c5, Black must move to d7 or e7. However, if White moves to c5 and Black moves to d7, then play can proceed Kd4 Ke7 Ke3 Kf7 Kf4 and Black is doomed. Thus, it turns out that, if White moves to c5, Black must reply by moving to e7. If White moves to d4, Black has to be ready to move to e7 and to be ready to fend off an attack on the g4 pawn. The only possibility is to reply to Kd4 with …Kf7. If White moves to e3, Black has to be able to get to e7 in two moves and be ready to defend the g4 pawn. Hence, Black has to reply to Ke3 with Kg6. If White moves to d3, Black has to be ready to reply to Kd4 with ...Kf7 and be ready to reply to Ke3 with Kg6. Hence, Black must reply to Kd3 with Kg7. Similarly, if White moves to c4, Black has to be able to move to e7, f7, and g7. The only possibility is f8. To summarize what we have so far:

The reply to Kc5 must be ...Ke7.

The reply to Kd4 must be ...Kf7.

The reply to Ke3 must be ...Kg6.

The reply to Kd3 must be ...Kg7.

The reply to Kc4 must be ...Kf8.

One can proceed in this fashion to find more corresponding squares in this somewhat contrived position.

Isn't this discussion the same as "holding opposition "?

Or you are talking about totally different problem? ...

I do not know what "holding opposition" discussion or problem you have in mind. My impression is that it is not customary to use the word, "opposition", in connection with the sort of reasoning that I described for this problem:


OldPatzerMike

"It must be understood that the opposition is only a special case of corresponding squares." [Emphasis in the original.] -- Yusupov, Build Up Your Chess 1, Chapter 10.

kindaspongey
OldPatzerMike (the one on the right) wrote:

"It must be understood that the opposition is only a special case of corresponding squares." [Emphasis in the original.] -- Yusupov, Build Up Your Chess 1, Chapter 10.

In somewhat the same way, being in Moscow is a special case of being in Russia. A map of Moscow would be of limited value if one's goal was to know how to get around Siberia. Similarly, the Yusupov "opposition" chapter is of limited value in trying to understand a problem like the one I discussed above. In Build Up Your Chess 2, Chapter 20, Yusupov briefly referred to the problem that was discussed at:

https://www.chess.com/forum/view/endgames/triangulation-troubles

Doing a quick search, I did not find a Yusupov attempt to explain problems like the one I started to explain above.

joseph1000000
OldPatzerMike wrote:

"It must be understood that the opposition is only a special case of corresponding squares." [Emphasis in the original.] -- Yusupov, Build Up Your Chess 1, Chapter 10.

That is the clear answer to my question.